If you’ve been following developments at Microsoft during the tenure of CEO Satya Nadella, it is likely you have heard him say “Microsoft Loves Open Source!”
Here at SNP, we did not need to be convinced of the value open source tools bring to our customers. A case in point is Jenkins, an open source automation server that has been a leader in the DevOps tooling marketplace. For several years, Jenkins has been SNP’s go-to software for continuous integration and continuous delivery (CI/CD) pipelines.
For its part, Microsoft is also a Jenkins fan, having an entire section of its Azure documentation devoted to Jenkins on Azure. As well, there are tutorials to cover specific use cases in the Azure context, such as to deploy from GitHub to Azure Kubernetes Service (AKS) with Jenkins.
To get started with Jenkins in Azure, Microsoft provides a guide to creating a Jenkins server on an Azure Linux VM from the Azure portal. This is all well and good, but this requires love and attention to a virtual machine, and that may not be your cup of tea. Jenkins as a service may be more to your liking. For this one can deploy Jenkins on Azure Web App for Containers. (At this time, put on your finest British accent, and repeat after me, “Jenkins at your service on Azure, Madam”.)
In the open source spirit, SNP has contributed a Docker image solution on GitHub titled Jenkins on Azure Web App for Containers. You can fork the Git repo to use as the basis for your own container image.
What follows is a step by step guide to deploy Jenkins on Azure Web App for Containers.
Get the Git Repository
Visit Jenkins on Azure Web App for Containers to clone or fork the repo. Read the README.md file, of course, and review the files in the repository.
Build an Image, Push to a Container Registry
The following steps assume you have Docker installed in your development environment.
In your favorite terminal, e.g. Git Bash, switch to the directory in which you cloned the repository.
At the command link, enter the Docker build command, for example:
docker build -t mikesacr.azurecr.io/jenkinsonazure:v1 .
List images to verify the build:
docker images
Run the image locally, for example:
docker run -p 8080:8080 mikesacr.azurecr.io/jenkinsonazure:v1
Push the image to a container repository. For example, using Azure Container Registry:
docker login mikesacr.azurecr.io -u myusername docker push mikesacr.azurecr.io/jenkinsonazure:v1
Once complete, a sha256 value with a unique identifier for your image is displayed, for example:

This sha256 is also visible in the Azure Portal, for example:

Deploy your Container Image on Web App for Containers
The following steps assume you have an Azure Subscription and an App Service Plan.
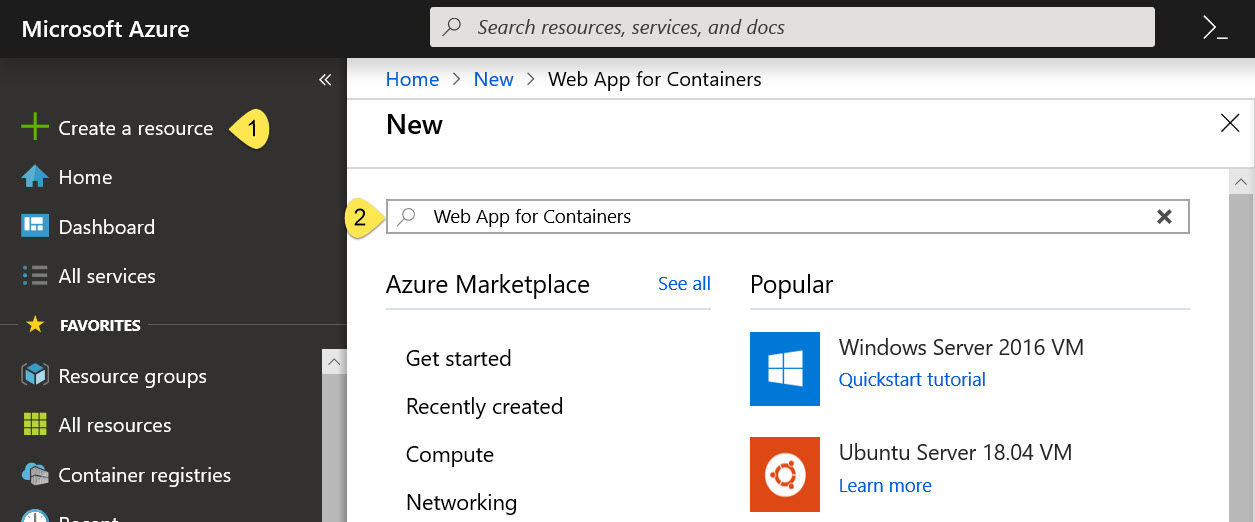
Create a Web App for Containers Resource
In Azure Portal, click “Create a resource”, then search for “Web App for Containers”:
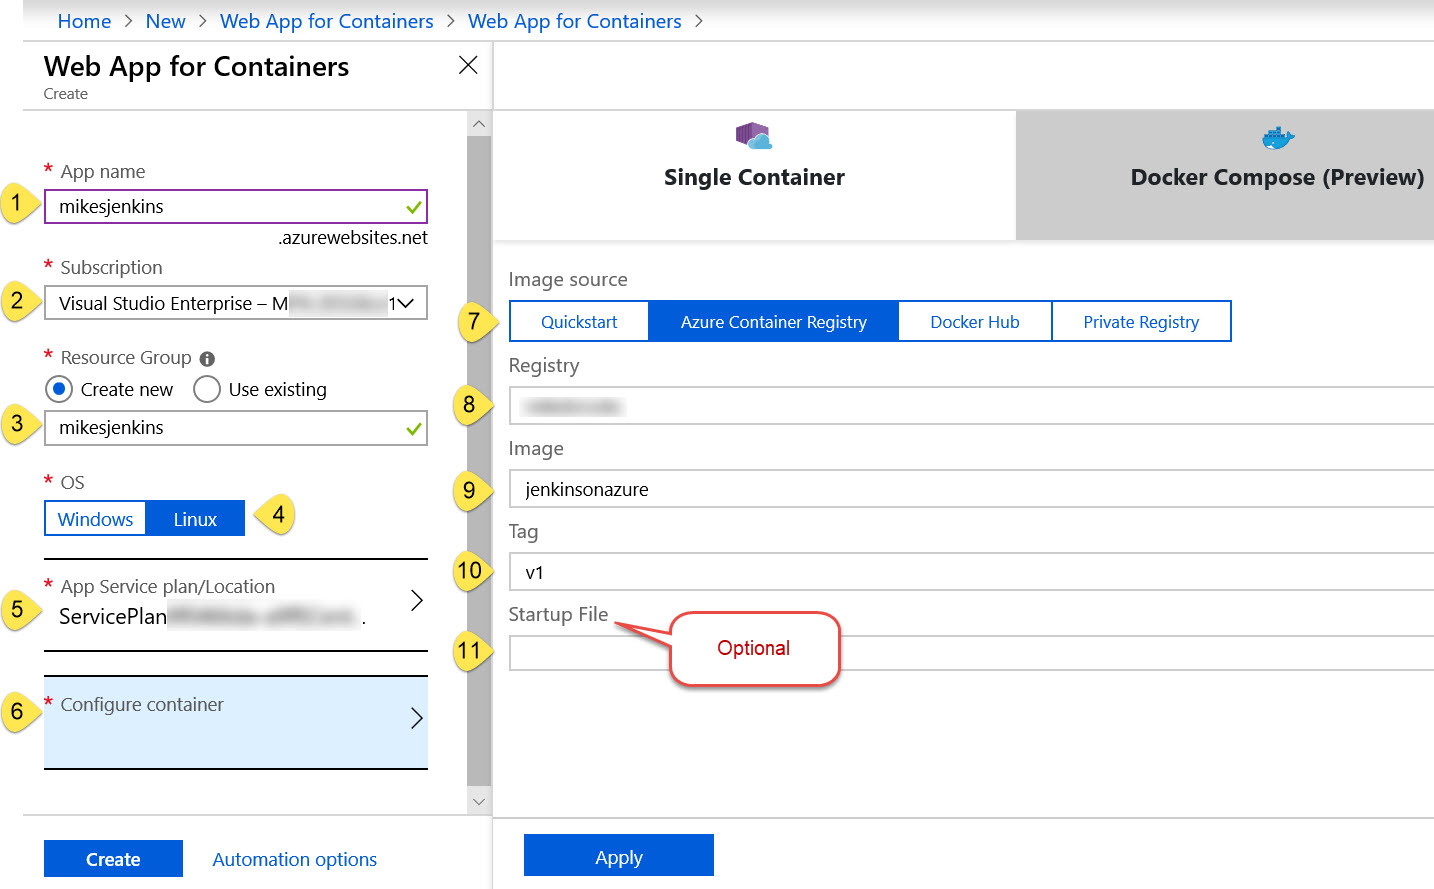
This will open a Web App for Containers resource information blade. Click on the “Create” button at the bottom of the blade:

Next, fill in values for the parameters required to create your resource.
- Enter a unique App name
- Select your Azure Subscription
- Select a Resource Group. I recommend a new resource group because the life cycle of your Jenkins app will probably be independent of that of other applications.
- Select “Linux” as your OS
- Select an App Service plan/Location. If you have not already created a Service Plan, that’s OK. A new one can be created from here. The Service Plan should be in the same region as the Resource Group. Check this list of locations that support the Web App for Containers.
- Configure container. Here we identify the container registry and container image to be deployed to the Web App. Click the “Apply” when done filling in this blade.
- Click the “Create” button
Note: Alternatively, the preceding steps can be accomplished using the Azure CLI.
When the deployment completes, you should see your new Resource Group and new Web App resource in Azure Portal. Click on the Web App Resource. There are a few steps you need to complete before running your Jenkins application, as noted in the README.md file.
Web App Configuration Steps
- Ensure that the
WEBSITES_ENABLE_APP_SERVICE_STORAGEapp setting to “true” in the Application settings blade of the Web App.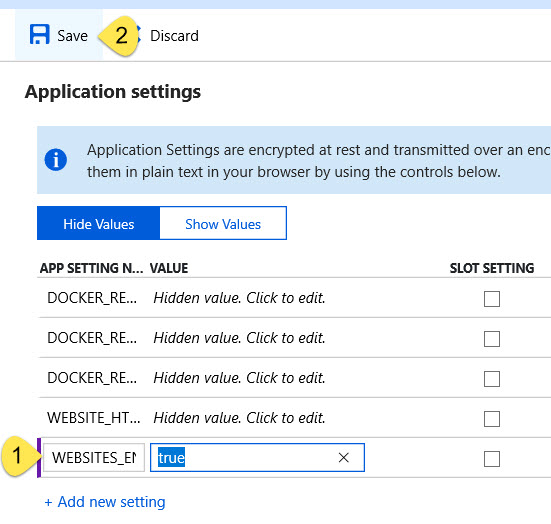
- Manually create the
jenkins_homedirectory in the Web App/homedirectory
before you run the container and install Jenkins. This can be done from the Kudu Bash screen or from an FTPS session.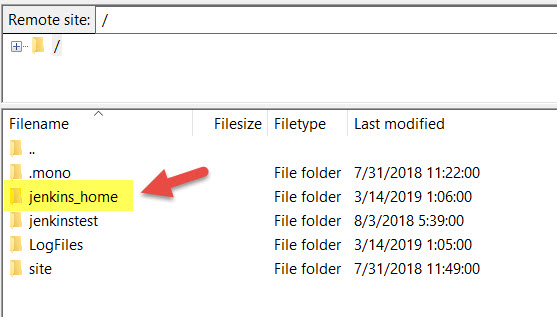
Run your Jenkins Container
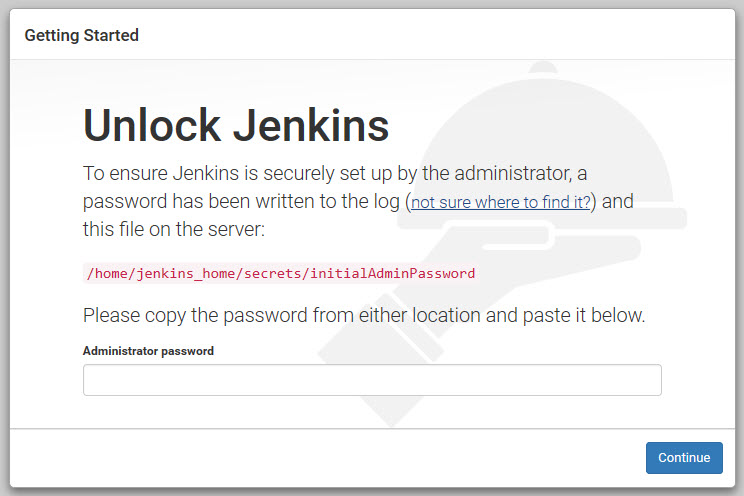
From the Web App Overview blade, click on the URL to run your Jenkins instance. After a brief initialization period, you should be presented with the Unlock Jenkins screen.
You are on your own from here, but keep in mind the “Gotchas” we have documented in the repo’s README.md file.
In Closing
If you have questions and suggestions to improve the solution, we are happy to receive issues and pull requests. Contact SNP here.